Showing posts with label Computer Experiments. Show all posts

Tuesday, 1 March 2016

Computer Experiments

 Colour Filter 

Colour Half Tone 

 Invert 

Lens Flare 

I decided to place a lens flare over the woman's face and this highlighted the meaning that I was trying to get across through the image. This was that no one ever pays attention to the food sellers in camden market so therefore it doesn't matter what they look like and by taking away her face and covering it I feel that this adds to the meaning and shows that no one knows who the photograph is off because no one pays attention to it. 


Mosaic

Noise

Surface Blur 


On this image I chose to use the surface blur in order to conceal her face but I left the eyes out so that it feels like she is looking at you but you can't really see her as she is blurred. This image now has a rather  strange connotation which is rather different to the angry connotation that is present in the raw image. I like that you get the creepy feel from the photograph as I feel that it all works well together and therefore it gives off a very strong emotional feeling and give the person a lot to think of. 


Posterize

Spherize

I used the spherize to highlight that the bagpipe player stands out in London and this is shown through the fact that he is the main feature within the photograph. This experiment worked well because it makes the man stand out just like a bagpiper player does in London as it is not something that you would expect to see there on a day to day basis. I think the spherize effect works well with this photograph as it all stands out and creates a thinking device through the photograph as people wonder why that experiment has been done. 

Threshold

Tuesday, 1 December 2015

Editing - Vignette

 In this photo a vignette has been applied to the photograph on the right


Step 1 - create a new adjustment layer for curves


Step 2 - click okay on the layer name


Step 3 - over exaggerate the curve


Step 4 - Make sure the top square is black and white


Step 5 - Click on the gradient tool and then click on gradient


Step 6 - Click on radial button (the selected button)


Step 7 - Drag out from the photo creating a vignette


Editing - Sharpen


 To edit this photo I have sharpened the image to make it look better. The Sharpened image is the image on the right

Step 1 - Duplicate the layer by clicking on layer then duplicate layer 


Step 2 - Change the layer name to Sharpen 


Step 3 - Go to filter - Sharpen then Unsharp Mask 


Step 4 - Change the amount percentage and radius of pixels to get the desired effect.  When you reach the desired effect click OK.


Editing - Dodge and Burn


 The image on the right has had both dodge and burn applied to it. Dodge has been applied to the left half of the face and burn to the right
Step 1 - Select around the part of the image you want to change using the quick selection 


Step 2 - Using the magnifying glass on the left hand side select either burn of dodge- burn makes the picture darker and dodge makes the area lighter. 


Step 3 - Feather the image by select the select button and then refine edge


Step 4 - This box will appear and then just change the feather to make it look clearer then click okay and the photo will change.


Editing - Hue and Saturation


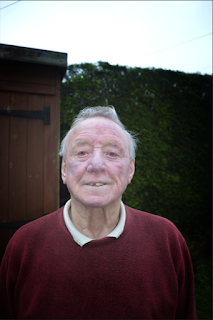
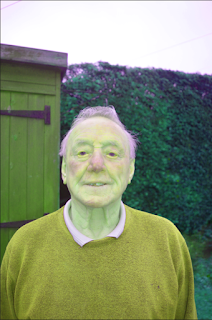
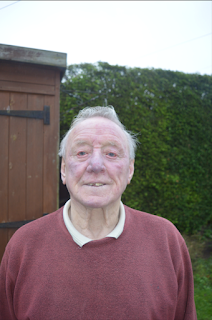
Here is a photo that has been edited by changing the hue and saturation. The photo on the right has been heavily edited to show exactly what can be done with changing the hue and saturation.


Step 1 - Go to Layers, then to New Adjustment Layer and then Hue and Saturation
Step 2 - This box will appear then click use previous layer. 


Step 3 - This screen will appear move all 3 of the arrows to get the desired effect on the photograph 


Step 4 - Once the desired effect has been achieved press the double arrows on the small levels screen to close the screen

Editing - Curves

This is a before and after shoot of a photo. The photo on the left is before the levels are changed and the one on the right is after they have been changed. 


Step 1 - Go to Layers, then to New Adjustment Layer and then Curves


Step 2 - This box will appear then click use previous layer. 

Step 3 - This screen will appear move different parts of the curve to get the desired effect on the photograph 


Step 4 - Once the desired effect has been achieved press the double arrows on the small levels screen to close the screen


Editing - Levels

 Before and After the levels were changed on this picture.

The photo on the right is darker because i have changed the levels in the photo to make the whole picture darker.


Step 1 - Go to Layers, then to New Adjustment Layer and then Layers


Step 2 - This box will appear then click use previous layer. 


Step 3 - This screen will appear move all 3 of the arrows to get the desired effect on the photograph 


Step 4 - Once the desired effect has been achieved press the double arrows on the small levels screen to close the screen

Thursday, 1 October 2015

Colour Manipulation

During Thursdays afternoon lesson we were tasked with creating colour manipulations on some images that we had already taken, although I had already attempted this in one of my images in colour the way it was taught to us during this lesson was a lot similar and quicker and far more accurate. 
Here are the steps 
Step 1- using selection tool select the area you wish to change 
Step 2 - click select and then click invert 
Step 3- Select image adjustment layer invert 
Step 4 - click select then deselect
Step 5- at the bottom sleet adjustment then hue/saturation 
Step 6- Play around with the levels till you get the desired colour 
Step 7 Close Hue/Saturation tab and save image


The first image in is the image as it looked when I took the photo. I found the colours quid dull and that they didn't really stand out. In the second image I made the man black and white and manipulated the rest of the picture to make the colours brighter and make them stand out even more. I like that the colours are now brighter and makes the singer stand out more because he is in black and white. However in the third image I have turned the guitar a different colour and made the the rest of the picture black and white. I did this to make the guitar stand out even more and really capture the attention of the person looking at the photo because they instantly drawn in to the that point of the photo.